If you've recently upgraded your router or moved to a new location, you may need to reconnect your Netgear WiFi extender to the new router. This is a simple process that ensures your extender continues to provide you with excellent wireless coverage. In this guide, we'll walk you through the steps to connect Netgear WiFi extender to a new router.
Methods 1. Connecting a Netgear WiFi extender to a new router using Web interface
Step 1: Prepare Your Equipment
Before you begin the setup process, gather the following items:
- Your Netgear WiFi extender.
- The new router's network name (SSID) and password.
- A device with a web browser (e.g., a computer, laptop, or smartphone).
- An Ethernet cable (optional but useful for initial setup).
Step 2: Reset the Extender (If Necessary)
If your Netgear WiFi extender was previously connected to a different network, it's a good idea to reset it to its default settings. This ensures that you're starting with a clean slate. To reset the extender, locate the reset button on the device (usually a small hole) and press it with a paperclip or a similar tool for about 10 seconds. The extender will reboot and return to its factory settings.
Step 3: Power On the Extender
Plug in your Netgear WiFi extender into a power outlet. Ensure that it is within range of your new router but not too close. A moderate distance is ideal to ensure it can effectively extend your network.
Step 4: Connect to the Extender
Using your computer or mobile device, open your list of available WiFi networks. You should see a new network with a name similar to "NETGEAR_EXT" or "EXXXXX" (where "XXXXX" is a unique identifier for your extender). Connect to this network.
Step 5: Access the Extender's Web Interface
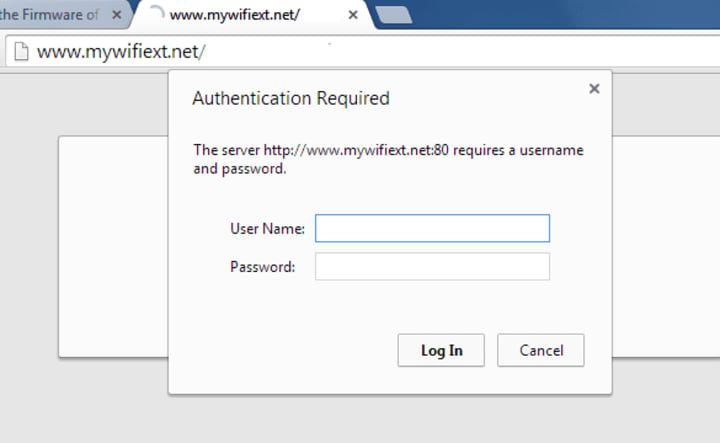
Once connected to the extender's network, open a web browser and enter "http://mywifiext.net" in the address bar. This URL will take you to the Netgear extender setup page.
Step 6: Set Up the Extender
You'll be prompted to log in to the extender's interface. If you haven't set a custom username and password, use the default credentials (usually "admin" for both username and password). Make sure to change these default login credentials for security purposes.
Follow the on-screen instructions to configure the extender. When prompted, enter the SSID and password of your new router. The extender will then connect to your new network.
Step 7: Reconnect to Your Home Network
Once the extender successfully connects to your new router, it may reboot. After it comes back online, disconnect from the extender's network and reconnect to your home network. Your Netgear WiFi extender is now connected to your new router and ready to provide extended WiFi coverage.
Step 8: Test Your Extended Network
To ensure that your Netgear WiFi extender is working correctly, move to an area that was previously a dead zone in your home. Connect a device to your home network and check if you have a strong and stable WiFi signal.
Methods 2. Connecting a Netgear WiFi extender to a new router using WPS (Wi-Fi Protected Setup)
Note: Before you begin, ensure that your Netgear WiFi extender and new router both support WPS. Most modern routers and extenders do, but it's essential to check your device's user manual or specifications to confirm this.
Press the WPS Button on the Router:
On your new router, locate and press the WPS button. This typically involves holding down the WPS button for a few seconds until the WPS LED starts blinking. The exact location of the button and the LED may vary depending on your router model.
Press the WPS Button on the Extender:
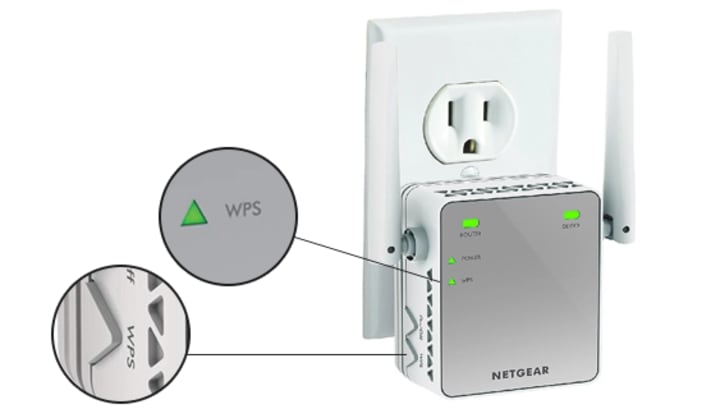
Quickly go to your Netgear WiFi extender and press its WPS button. Again, the location of this button may vary depending on the extender model. After pressing the WPS button, the extender will start looking for the router's signal.
Wait for the Connection:
The WPS LED on your extender should start blinking, indicating that it's trying to establish a connection with the router. This process may take a minute or two.
Connection Confirmation:
Once the extender successfully connects to your new router, the WPS LED on both the router and the extender should become solid, indicating a successful connection.
Test Your Extended Network:
To verify that the extender is working correctly, move to an area that previously had poor or no WiFi signal. Connect a device to your extended network and confirm that you now have a strong and stable WiFi connection.
Congratulations, you've successfully connected Netgear WiFi extender to your new router! You should now enjoy improved WiFi coverage and better connectivity throughout your home or office.
Experience seamless connectivity - call us at +1(855)201-8071 now to connect your Netgear WiFi extender to your new router!
Source Link: https://www.wirelessextendersetup.org/connect-netgear-extender-to-new-router/

No comments yet