Most people are intimidated by the prospect of setting up a printer. However, once you know the steps, it's fairly simple. Here's how to add printer to Mac desktop or laptop, whether you only need to add one printer to your home computer or many printers to a business network.
How to Setup a Wireless Printer on a Mac-
You can connect your printer wirelessly using Wi-Fi Protected Setup (WPS) or Bluetooth. Depending on how you want to connect your printer, follow the steps below.
How to Add Printer to Mac via WPS-
Normally, to connect via WPS, press the "Wireless" or "Wi-Fi" button on your printer, followed by the WPS button on your router. However, the steps will differ depending on your printer and router, so consult your printer and router user guides for specific instructions. After you've configured WPS, you can proceed to the steps below.
- In the top-left corner of your screen, click the Apple icon.
- Navigate to System Preferences.
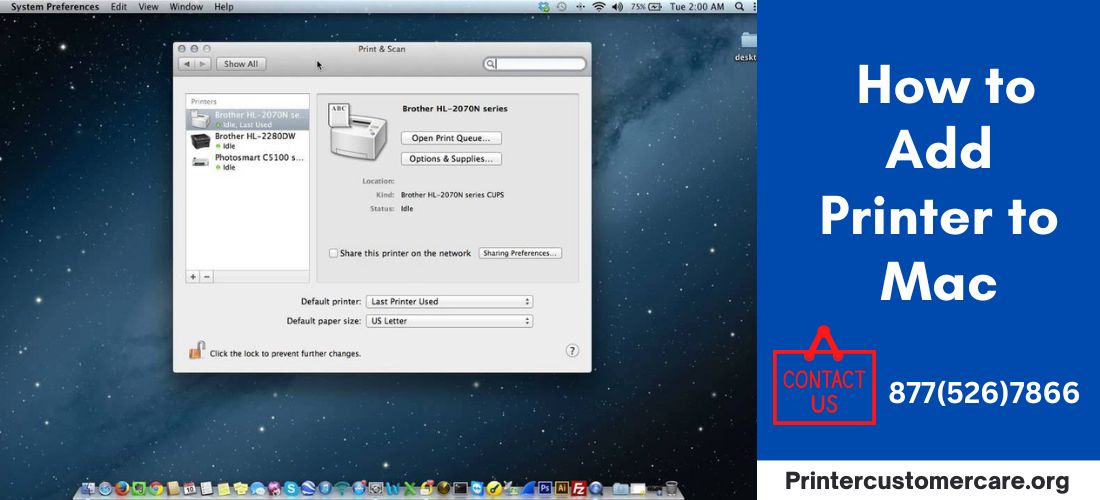
- Select Printers and Scanners. Print & Scan will appear under Hardware on older Mac models.
- Click the + sign to the right of the printer list. After clicking the + sign, you may need to click Add Printer or Scanner on older Mac models. Printers detected by your Mac may also appear under Nearby Printers in the Add Printer or Scanner submenu.
- If you are unable to click on the + sign, you may need to click the Lock icon at the bottom of the window. To make changes in the Print & Scan menu, enter your password.
- Choose the printer you want to add. Your Mac displays a list of network-discoverable printers in the Default tab.
- In the Use field, select the printer's software or driver. You have the following options:
- AirPrint is Apple's native printing technology that allows you to print wirelessly from AirPrint-compatible printers. If your printer isn't AirPrint-compatible, you'll need to download the driver from Apple's servers or the manufacturer's website.
- If you have your printer's own print driver installed, use it.
- If you don't have the print driver but want your computer to download the correct one when it updates, choose Auto Select.
- Finally, press the Add button. The new printer will be added to the printer list. This will be visible on the left side of the Print & Scan window.
How to Add Printer to Mac via IP Address-
If you use this method to add a printer, you must know your printer's IP address. Here's how to find the IP address of your printer. Once you have this information, simply go to System Preferences and add the printer from the Printers & Scanners menu. Here's how to do it step by step.
- Choose the Apple icon.
- Navigate to System Preferences.
- Select Printers and Scanners.
- Then, beneath the list of printers, click the + sign.
- Select the IP icon. This will resemble a blue globe icon.
- In the Address field, enter the IP address of your printer. Your Mac will attempt to gather printer information.
Note-If you don't know how to find your printer's IP address, see our previous article on how to do so.
- If you want, rename the printer.
- Select the print driver you want to use in the Use field.
- Select Add.
How to Add Printer to Mac via USB-
Printers without networking capabilities can only be added via USB or wired connection. Some printers, despite being capable of wireless printing, require a USB connection during the setup process. Here's how to connect a USB printer.
Connect your printer's USB cable to your Mac laptop or desktop.
Please keep in mind that your Mac will automatically detect USB-connected printers and download the necessary software. Proceed to the next step if it does not auto-detect.
- Choose the Apple icon.
- Navigate to System Preferences.
- Select Printers and Scanners from the drop-down menu. Print & Scan will appear under Hardware on older Mac models.
- Click the + sign to the right of the printer list.
- Choose a printer to add. Your Mac will auto-populate a list of network printers in the Default tab. Look for a printer name that has USB in the Kind column.
- Select Add. The printer will be added to the printer list. This will be visible on the left side of the Print & Scan window.
If you still are not able to Add Printer to Mac, Then call our experts. They will provide you with technical support. For any query you can visit our website. printercustomercare.org

No comments yet