If you are someone whose Netgear routers and extenders are not working, then the primary reason could be that you may not have done the proper Orbi Login Setup. If you can set up your NetgearOrbi device, you would be enhanced just not the WiFi coverage range but also by eliminating all the dead spots.
It may seem very challenging to set up an Orbi set up in your home, especially if you have no idea about the device's working. But, let us tell you that it is not. With the help of this given guide, you'll learn the step-by-step instructions for setting up a NetgearOrbi and that too in a manual way. So, keep reading on to know more.
Performing OrbiWiFi Setup Manually
Hardware Configuration
The process of the setup begins by creating a connection which would be between the router and the modem. After you turn the power on your Orbi device, you will need to connect it with the existing modem. Using an Ethernet cable instead of a wireless source to connect both of your WiFi devices would be a much better choice.
It is preferred that a wired connection is considered a much safer and reliable option to connect devices if put into comparison with a wireless connection. Along with that, you quill also need to ensure that the cable you are using has no cuts or breakage of any kind. Or else it could be possible that you may end up getting stuck with all sorts of unwanted technical glitches while trying to perform the WiFi setup.
Setting up the Orbi Satellite
Once you have completed configuring the hardware of your NetgearOrbi router, it will be time to give some attention to the Orbi satellite as well. A few of the things which you should keep in your mind have been given below:
1. Firstly, you would need to place your Orbi satellite close to the Orbi router.
2. Secondly, you’d need to ensure that a safe distance between the WiFi devices is always maintained.
3. Thirdly, you should never place the satellite near a concrete wall. Otherwise, you will see that the WiFi signals will get blocked.
4. Now, you would have to press the Sync button on the NetgearOrbi satellite.
5. Now, you would have to patiently wait for the Orbi router and the satellite to get synced properly.
Accessing the web user interface
The next course of action is to access the web interface which belongs to your NetgearOrbiWiFi router. The steps to follow to do that are as follows:
1. As the first step, you will need to open Google Chrome on your computer.
2. Then, you will need to enter the orbilogin.com. Do this in the URL bar of the web browser.
3. After that, continue the process by pressing the Enter key so that you can proceed further.
4. If you happen to see that the default web address is no longer working, you can utilize the default IP address.
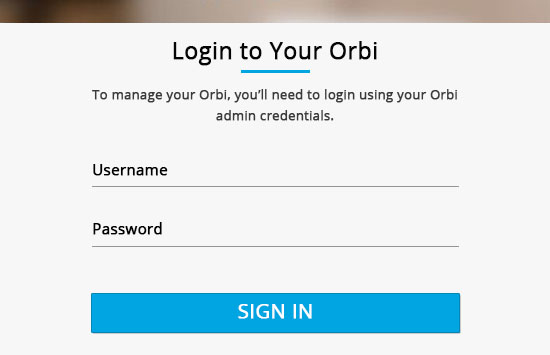
Entering the Default Orbi Login Credentials
1. Once you have entered the default credentials for your Orbi login, you will see that a window will appear on your screen,
2. After that, you will be required to enter the details in the respective fields and then click on the login option.
3. The required details will be inclusive of the default username and the password of your device.
After you have successfully logged into your NetgearOrbi router, you would then need to follow the on-screen instructions as displayed on your Netgear Genie dashboard.
This will conclude the completion of your OrbiWiFi setup process.
Configuring Orbi Port Forwarding
Having a server in your home WiFi network often results in getting certain types of traffic for reaching the server. For example, you can have an FTP server, local web server, or gaming server available to the internet. What will happen is is that your home router will be able to forward the internet traffic to computers or on all those devices which are registered on your local network. This will take place with the assistance of some particular protocols. Then you can mention the servers for numerous applications and mention a default server to which your home router would be able to forward all your incoming protocols. Continue reading if you wish to know about the configuration of Orbi port forwarding.
Configuring Orbi Port Forwarding
1. Before starting with the Orbi port forwarding process, we suggest you decide the application type, service type, or game type you wish to offer.
2. After that, you will need to locate the local IP address of the server, which would be currently used by your network responsible for providing you with the same service or game type you would want to offer.
3. At this step, you will have to proceed further by opening up an internet browser on your computer connected to your Orbi.
4. Lastly, try to access the Orbi login web address. For this, try typing this out in the web address bar of your browser. Ensure that you are not making any spelling errors. Also, see that your version of the web browser is updated to the latest version and is not packed with junk of caches and cookies.
5. Once you press the enter key, the Orbi login window would appear on the screen.
6. After that, you will have to type your username and password to have a successful Orbi login success.
7. Try to access the dashboard or the graphical user interface of your device now.
8. Select Advanced from the Settings.
9. Then, try to find the Orbi Port Forwarding option and select it.
10. For choosing the option, you will just need to tweak the radio button simply. Remember to select it as the service type.
11. You will now have to select the service name under the list of the Service Name.
12. If you are unable to find the service name that you want to select from the list that appears right in front of you, you also have the option where you can create a custom service.
13. Going forward, you will now need to enter the IP address of your device. Do this step under the field name of the Server IP address.
14. Right after you hit the Add button, and you will see that the configuration job of the Orbi port forwarding will stand done and completed.
15. Lastly, you will no longer see the name of the service in the list.
Hence, this is how you could configure all the setup and port forwarding, including the Orbi login process. If you face any difficulty, then feel free to contact the experts for quick and specialized assistance.

No comments yet