How To Avoid Vibration And Loopback Textures From 3D Printers
When printing, your 3D printer vibrates, which causes ghosting, ringing, and rippling effects on your prints. This can be annoying and can cause some print quality issues.
One of the most effective ways to reduce vibrations is to place your printer on a stable surface with vibration dampening parts. This will help to absorb the vibrations and reduce noise from your 3D printer.
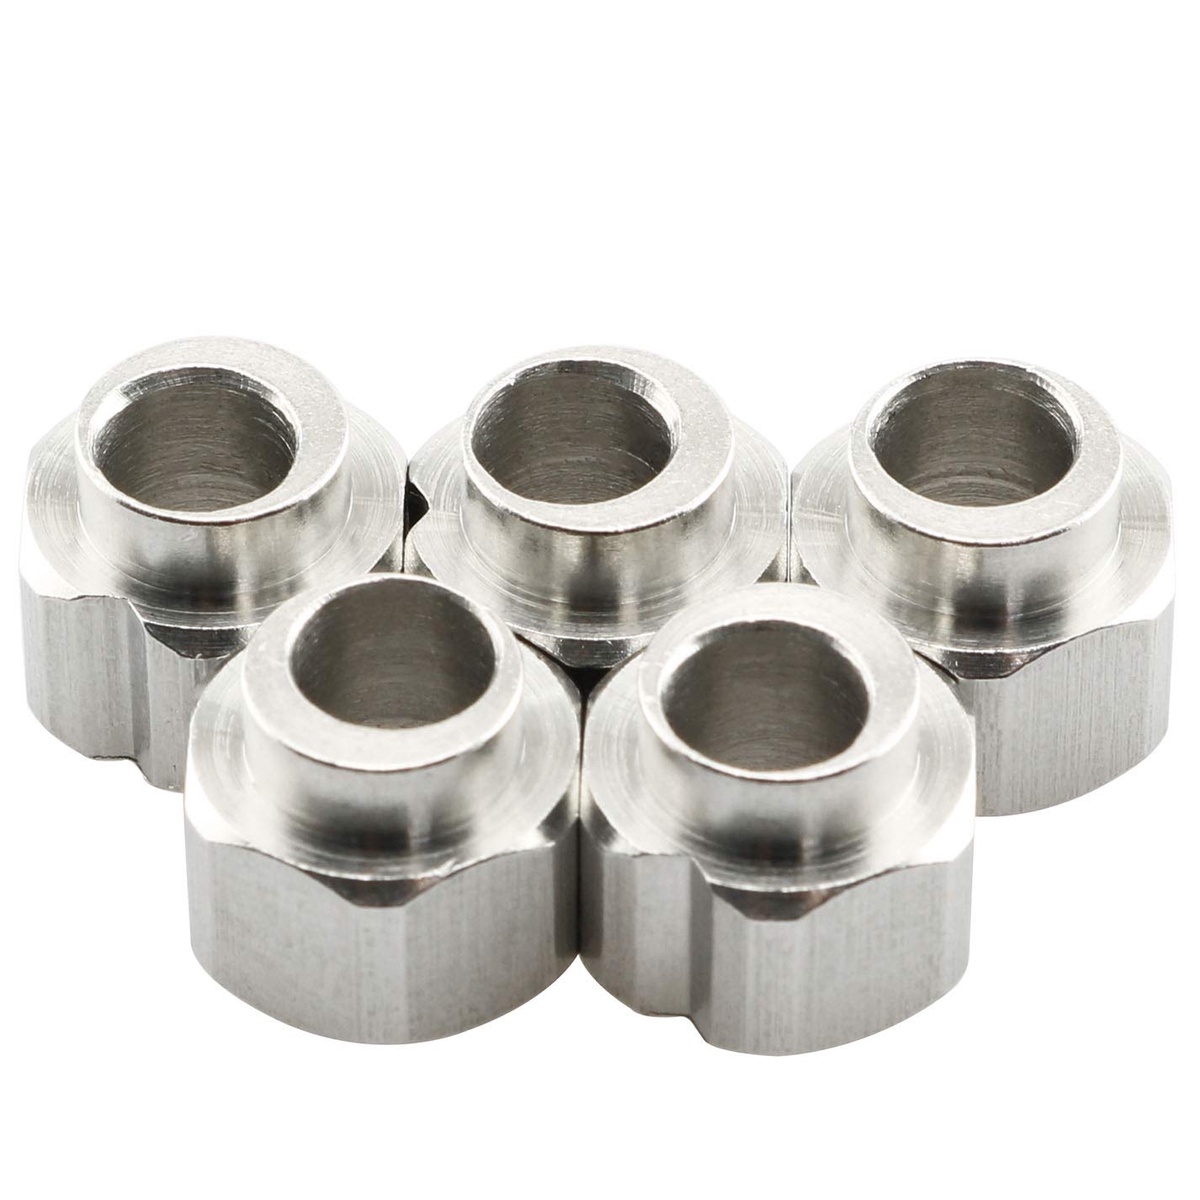
1. Adjust the eccentric nuts
Vibrations are a common issue that can affect the quality of your prints. They can cause ghosting, ringing, echoing, and rippling, which are all unpleasant effects. The best way to avoid these effects is to reduce your printing speeds, jerk, and acceleration settings. Additionally, ensure that all the screws on your 3D printer are tight and that there are no loose belts. Another effective solution is to place your 3D printer and acme nut block on a stable surface with vibration dampening parts.
One of the easiest ways to avoid vibrations in your 3D printer is to adjust the eccentric nuts on the X and Z axis carriages. These nuts are used to secure the POM wheels on the carriages to ensure that they don't wobble as much during printing.
First, identify the POM wheel that has an eccentric nut; this should be the one on the top of the wheel, usually near the bottom. Next, using the proper spanner, tighten the nut until there is no play in the wheel. This will ensure that the X and Z axis wheels are firmly attached to the frame of your printer.
A loose eccentric nut can also cause your X axis to sway back and forth, which will interfere with your printing process and result in lower print quality. Fortunately, this can be easily fixed by adjusting the eccentric nuts on the POM wheels of your X axis carriage.
Tightening the eccentric nuts on your X axis can also help to eliminate a common problem that causes the X axis to sway: binding. This can be caused by either a flaw in the assembly or wear and tear during use.
Finally, if you're experiencing loopback texture on your prints, it can be due to the extruder changing direction quickly. This can happen when the extruder is reorienting itself to print a different face of a cube, or when it's printing a curved surface.
If you're unsure about how to correct this issue, watch the video below and follow the instructions. Tightening the eccentric nuts on your POM wheels should make these issues go away for good!

2. Check the belts
If you’re having trouble with vibration or loopback textures in your 3d prints, it may be time to check your belts. A properly tensioned belt will help prevent these issues from recurring, allowing you to print flawless, high-quality designs with eccentric spacer.
Belts are the main drive unit on your printer, moving the X and Y axes as the print head moves along them. They should be tightly wound to provide a consistent, smooth movement of the axes. When they are loose, the axes may clunk and skip around, and can cause layer shifts in your 3d prints.
Proper belt tension is a critical component of every FDM 3D printer. When they’re not tight enough, your belts can cause a variety of issues with your printer and can even harm it.
It can be difficult to gauge how tight your belts are, so it’s helpful to use a phone app to test them. One example is Smart Tension, which can be downloaded from the Apple Store or Google Play. Simply strum the belt to make it sound, and the app will tell you how tight or loose it is.
Another method is to press down on the X and Y axis belts with your fingers until you feel resistance, but not too much. This should be similar to the tension of a stretched rubber band for lead screw, but should not be so tight that it’s rigid. Over-tightening can strain the belts and wear them out faster.
Once you know the ideal tension for your X and Y axis belts, you can check them regularly to make sure they’re in good condition. Newer Ender 3 models, like Creality’s Ender 3, have built-in tensioners that make this task easy. But older 3D printers need an Allen key to tension the belts.
When you’re checking your belts, it’s a good idea to test them while you’re working on your 3d printer. That way, you’ll be able to see if they’re tight or loose while you’re printing, and will have a better idea of how to adjust them before you start your next project.
3. Check the bearings
You may not think about it often, but your 3D printer needs bearings to keep the machine working properly. A good bearing system will allow the axis to move smoothly without any vibration or loopback texture, which can make printing harder.
The type of bearing you choose is important, especially if you want to avoid any damage to your machine. There are a number of different types and sizes of bearings to choose from, including radial and linear.
If you want to avoid damaging your machine, then choose a bearing that is made of high-quality material and fits the shaft perfectly. There are a number of high-quality manufacturers that make bearings for your 3D printer, so you should be able to find one that works well for you.
Once you have found a bearing that suits your needs, you should inspect it for quality. This means taking it out of its box and looking inside to see if there is any debris in the race or if the balls are chunky/scratchy/odd (which can break and dislodge from the rods and shaft).
Preventative greasing is also recommended, as this will help extend the life of your bearings. There are a variety of different greases available for you to use, but heavier weight lithium based greases are usually the best option, as they have enough viscosity to lubricate the inside of your bearings and prevent them from dragging and breaking.
Another important thing to consider is the environment in which you will be using your 3D printer. If you live in an area where there are a lot of dusty environments, then you should consider choosing a bearing that is made of a material like Graphalloy. This material is self-lubricating, non-galling and dimensionally stable, which will help ensure that your 3D printer stays running smoothly for many years to come.
Finally, you should check the bearings on your 3D printer from time to time. This can be done by gently rotating them around the shaft to see if there is any backlash or play. If you have any problems, you should replace the bearings before they fail and damage your machine.

4. Check the nozzles
The nozzle is one of the most important parts of your 3D printer. It’s responsible for depositing filament onto the print bed in order to bring your creations to life. However, it’s also a part that can easily get damaged or worn out over time with timing pulley.
Nozzles are made from different materials, including brass, stainless steel, hardened steel and specialty metals like tungsten and ruby. They come in a range of sizes, from a tiny 0.15mm (which is perfect for small prints) to a 1.2mm nozzle that’s ideal for printing large-scale models.
A good rule of thumb is to choose a nozzle that matches the type of material you’re using. For example, if you’re planning on printing with abrasive filaments, you may want to choose a hardened steel nozzle, which can handle these types of materials 10 times better than brass nozzles.
You can test out your nozzle to see if it’s in bad shape by examining the inside. If you can spot bumps, ridges or curves on the interior of your nozzle, it’s likely that it’s already worn out and needs to be replaced.
Another quick and easy way to test your nozzle is to pull it off the bed and extrude a short length of plastic. What you’re looking for is a straight-up squirt of plastic rather than something that bends or curls.
This is an easy and simple way to check whether your nozzle in ender 3 eccentric nut is in bad condition or not, and it’s a great way to save money on future nozzle replacements. If you do this test several times and find that your nozzle is giving off a squirt of plastic that’s constantly bending or curving, it’s likely that it’s damaged.
The bottom line is that it’s essential to examine your nozzles on a regular basis, especially if you’re using abrasive filaments or if you have a high-powered 3D printer. This will help to ensure that your prints are of the highest quality, and will allow you to avoid issues such as under-extrusion and uneven layering in your next prints.
Nozzles can be a very expensive component of any 3D printer, so it’s best to keep them in good working condition by checking the interior of your nozzle on a regular basis. This will help to prevent clogging and build-up of filaments, which can lead to lower-quality prints and other problems.

No comments yet