You can save significant time and money if you know how to pour concrete. The procedure of concrete pouring is easy, but if you are new to it, it can be challenging for you.
Whether you choose a site-mixed concrete or ready-mix concrete, it will require a detailed plan, proper equipment, and great attention to detail for successful pouring.
While there are many variations to concrete mixes and uses, this step-by-step guide to pouring concrete involves the basics of using bagged concrete and ready-mixed concrete for a small project to make the pouring process manageable.
Safety Precautions
The first step to the ready-mix concrete application is ensuring that the job site is safe, conductive, and meets all the legal requirements. It involves several things, such as applying to the local construction department to know about the setback of the building and the authorized permit.
Pouring concrete is not a job that can quickly start or stop without fatalistic circumstances. Before you begin spraying, it is essential to have the site ready and have all the tools and materials in place, including personal safety equipment, to protect yourself from an unforeseen event.
Outline the Form
Now it's time to figure out the quantity and form of the concrete. It would be best to level the ground before pouring concrete, as it will make the pouring process smooth.
After determining the size, measure the area where concrete pouring will be done and mark it. You can use strings to keep or place a stake at every corner. Flags will confuse you if they mark wires or gas lines because specific colour flags indicate various functions.
Keep the Site Ready
Remove all the objects or materials which would interfere with the pouring process. It includes trees, rocks, shrubs, grass, or old concrete slabs. Clean until you have uncovered raw ground.
Sometimes, the soil is removed to prepare the site for pouring. However, the depth may vary depending on the project you are working on. For example, if the objective is to pour concrete for the driveway with the surrounding area, it will make you remove soil to have the depth for the subbase of gravel; it will require 4 to 8 inches and 4 inches on top of it for the concrete slab.
Compress the ground with a hand tamper. It will allow you to apply weight by pressing down the entire area to create a firm subgrade. Please remember to tamper it evenly, as it will prevent the concrete from cracking down.
Build a Frame
The following step is to learn how to pour concrete, which involves building a form around the work site. If there is any curved structure, a plastic concrete form can be used as a sturdy shape. Create a line involving standard lumber like 1*4 boards and duplex two head nails so that it is easy to remove when the concrete is cured.
After building a frame, use the level to ensure it has an even height. Reinforce the remaining joints with the board from the outside to strengthen the shape. It will help you towards the finishing stage.
Construct a Gravel Subbase
The gravel base depends on the climate and soil conditions. Some locations are frost-free, while others have soil that can contract or expand as temperature changes. A 4 to 8-inch gravel layer is needed over the compacted subgrade. It protects the concrete from changing ground conditions.
An open-grade mix is cheaper and has the capacity for more water drainage. However, more delicate grade stones are better for a stable result. After laying over the gravel layer, use the tamper to compact it.
Mix the Concrete
Wear all the necessary safety gear to mix the concrete. You can rent a concrete mixer; a wheelbarrow or shovel will be sufficient if you work on a small project.
There are two ways to mix the concrete - one is manual, and the other is ready-mix concrete. Both methods are helpful, but one should choose depending on the project type. The manual way will require you to mix concrete on site while ready-mix concrete gets prepared in the manufacturing unit and reaches the area in ready-to-use form; it can be custom-made and delivered per your project's exact need. It leaves no mess around as it produces minimum waste.
Before you mix the concrete with water, please ensure the water is suitable for the mixing process. Hard water speeds up the curing time of concrete, weakening the concrete in more significant projects. If you receive hard water in your area, use filtered water to avoid the whitish look of the concrete.
Keeping some extra gallons of water nearby while you mix the concrete will be beneficial to prevent concrete from setting.
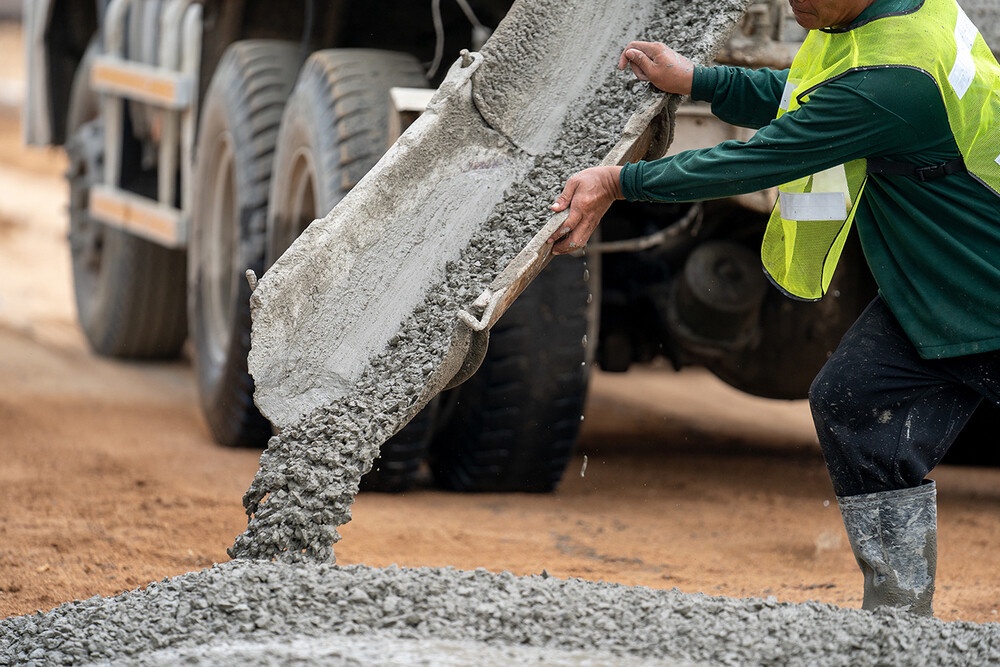
Pour the Concrete
After mixing the concrete, now it's time to pour it. If you have mixed the concrete in a wheelbarrow at the site, then tilt it to run the concrete, and if you have used a concrete pump or line truck, the operator will pour the concrete with the pipe attached to it.
Please ensure you have poured sufficient concrete, as it makes finishing easier. Rinse the wheelbarrow as soon as you finish the concrete pouring so that residue does not harden.
Apply a Screed Board to Level the Concrete
Level the top of poured concrete quickly before it begins to set. Use a long plank of wood or screed to reach the two sides of the poured concrete. It smooths the concrete after it is placed in the desired form.
The ideal way of using a screed is to rest the narrow side of it over the top of the concrete form in a back-and-forth sawing motion. Repeat it till you see the desired concrete surface.
Smooth the Concrete with Float
Use a float to give a professional touch. Apply it on the flat surface of the concrete. While using it, keep the far side a little elevated, and when you bring it back, keep the float back towards you; it will help you avoid drag marks.
Groove the Concrete
Groover is a long-handled tool used while standing to control the joints. It will let the concrete expand and contract with temperature changes, preventing surface cracks.
Brush the Concrete
In wet conditions, brush the concrete with a broom over the surface. But allow it to set enough so that brushing does not occur clumps. The temperature and humidity will help you decide when to brush it. If there is clumping, smooth the section again with the float.
Do the light dragging patterns with a broom across the entire area, but ensure it is not so deep that water can pull in them. After the grooving is done, you will see smooth adhesion.
Curing and Locking the Concrete
The curing process will be more straightforward if you have taken measurements to protect the concrete by roping it off. The standard curing time recommended by the industry is 28 days. Walking on a poured concrete slab after three days is safe, but it is better to let it be fully cured.
After the concrete is cured, seal it with a concrete sealer for longevity. Please use the concrete sealer suitable for the project and weather conditions. After applying the sealant, please wait for two-three days before you start using it.
Conclusion
RMS Ready-mix Specialists provide end-to-end concrete-mixed services in London, Kent and Essex. They deliver the concrete mix in a truck equipped with all the necessary tools to maintain the concrete pouring process or your project. We have various types of concrete mixtures for your project, and our experts help you choose the most appropriate combination for your project.
If you have more queries on how to cure concrete, please call us at + 44 808 274 0949 or visit us online.

No comments yet