Owning an RV is an adventure that gives cherishable moments and thrilling experiences with great journeys. But with all this comes a fair share of maintenance tasks. One common issue that arises over time is with the windows. As an RV owner, you know how journeys are and how they can damage or break the windows, be they due to weather or general wear and tear. A broken window can become an inconvenience and ruin the experience of traveling in an RV in no time, necessitating the need for repair or replacement. When dealing with a broken RV window, it is wise to contact professional Sacramento trailer repair services, as experts can assess the extent of damage and guide you on further steps to be taken.
Extensive damage may arise the need for window replacement promptly to maintain the structural integrity of the RV. Walk through the blog to learn the steps involved in replacing an RV window and understand how professional assistance can help navigate the intricacies of replacement.
Tools Required:
Before initiating the replacement, gather the necessary tools required for replacement:
Safety gear
Screwdriver
Putty knife
Sealant
Replacement window
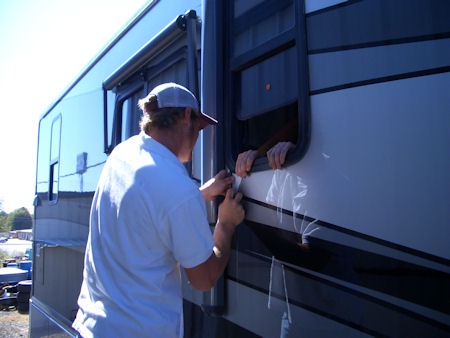
Steps for replacing an RV window
Safety is paramount! Before commencing the replacement process, ensure to wear protective gear, including goggles and gloves. Replacing windows involves accident risks. It is best to prioritize safety and rely on experienced RV service in Sacramento.
Remove the trim from the existing window with caution. Pry off the trim carefully using a putty knife without damaging the window frame. After removing the trim, remove the old window carefully by unscrewing the window frame.
Once the old window is removed, thoroughly clean the surrounding area. To ensure a smooth surface for the installation of the new window, remove any dirt, debris, old sealant, or any toxic material.
Handle the new window with care and place it into the opening, ensuring a precise fit and alignment. Use screws to attach the window frame to the RV. Tighten the screws to ensure a proper installation.
Apply a high-grade sealant around the window frame's edges to ensure a watertight and airtight seal. Let it dry for some time. Sealants help prevent potential leaks and ensure a secure fit.
Reinstall the trim surrounding the new window once the sealant is dry. Ensure that it fits securely.
Why Hire Professionals for RV Window Replacement?
Professionals bring their experience, skills, and expertise to the table and ensure to get the job done right the first time. They have access to specialized tools and equipment that ensure quick and efficient replacement, without compromising the quality. Experts perform the process with precision, safety, and attention to detail and employ industry best practices to provide longevity results.
Conclusion
Whether you have a broken RV window or you are considering replacing your RV windows to enhance the aesthetic appeal of your vehicle, knowing the steps included in the window replacement process is crucial. With the right tools and expert guidance, you can ensure a seamless replacement process. Don't let your damaged RV window ruin your journey experience. Get it repaired with experts now!

No comments yet