In the fast-paced world of e-commerce, captivating product photography has become an essential tool for businesses seeking to stand out in a crowded marketplace. Enter the photo light box - a game-changing solution that enables even amateur photographers to achieve professional-quality images. With countless options available on the market, finding the best photo light box for photography can be overwhelming. But fear not! In this article, we will guide you through everything you need to know about using a photo light box for product photography, helping you capture stunning shots that will wow your customers and boost your sales.
What is a Photo Light Box?
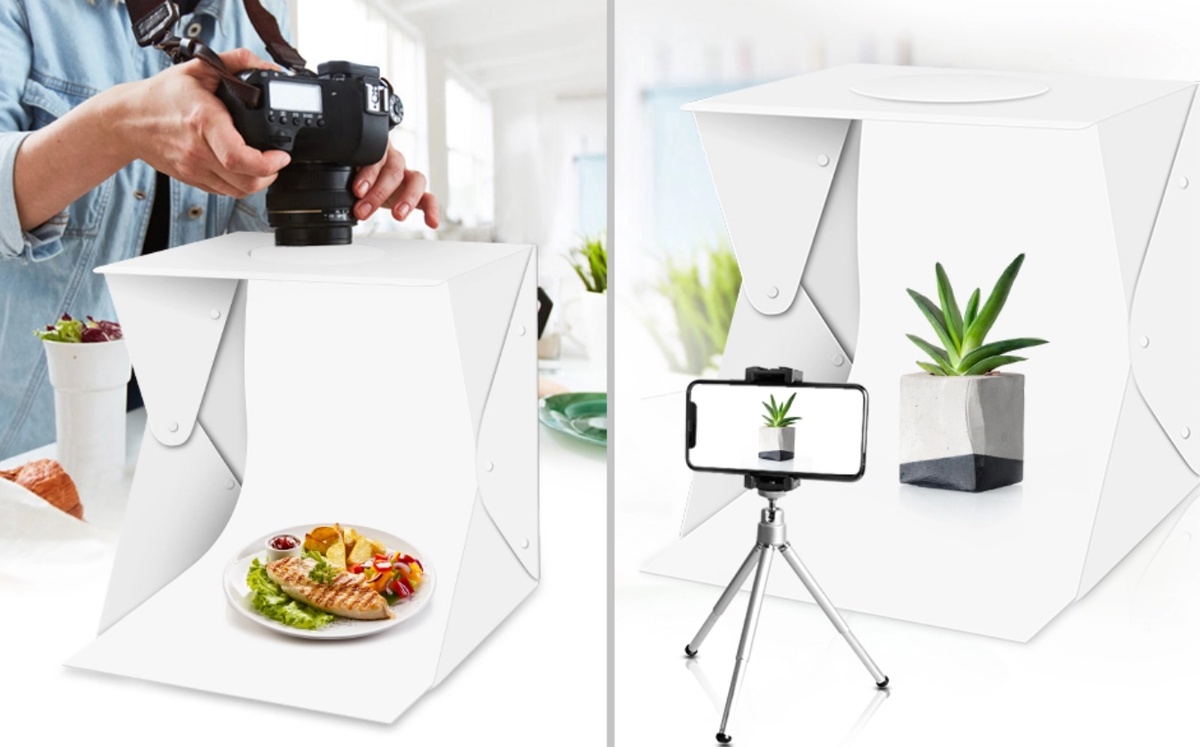
A photo light box is a specialized photography tool designed to create even and diffused lighting around your subject. It consists of a translucent box with built-in lighting, typically LED lights. The purpose of a light box is to eliminate harsh shadows, reduce glare, and provide a consistent background, making it ideal for capturing product images with a clean and professional look.
Why Use a Photo Light Box?
Uniform Lighting: One of the key advantages of using a photo light box is the ability to achieve uniform lighting around the subject. This minimizes shadows and hotspots, ensuring your product is well-lit from all angles.
Reduced Glare and Reflections: The diffused lighting within a light box helps reduce glare and reflections on shiny or reflective surfaces, such as glass, metal, or plastic, resulting in clear and captivating product images.
Consistent Background: With a light box, you can easily achieve a consistent background for your product photos, whether white, black, or any other color. This helps maintain a cohesive and professional look across your product catalog.
Time Efficiency: Using a photo light box streamlines the photography process, allowing you to capture high-quality images quickly. You don't need to spend hours setting up elaborate lighting rigs or post-processing images to remove unwanted shadows.
Affordability and Portability: Photo light boxes come in various sizes and price ranges, making them accessible to photographers with different budgets. They are also portable, making them convenient for photographers who need to shoot in various locations.
How to Use a Photo Light Box for Product Photography
Now that we understand the benefits of using a photo light box let's delve into the step-by-step process of effectively using one for product photography:
-
Choose the Right Light Box:
Consider the size of your products when selecting a light box. Ensure that it can comfortably accommodate your items without feeling cramped.
Opt for a light box with adjustable LED lighting to control the intensity and temperature of the light.
Check if it has various backdrop options, such as white, black, or colored backgrounds, to suit your product's aesthetic.
-
Set Up Your Workspace:
Choose a well-lit area with minimal ambient light. Natural light can work well, but ensure it's diffused and consistent throughout the day.
Place your light box on a stable surface like a table or a photography stand.
Ensure that the light box is clean and free from dust or smudges.
-
Arrange Your Products:
Clean and prepare your products beforehand to remove dust, fingerprints, or imperfections.
Position your products inside the light box, ensuring they are centered and well-framed within the opening.
Use adhesive putty or other props to help secure and position your products if necessary.
-
Set Up the Lighting:
Turn on the LED lights inside the light box. If your light box has adjustable lighting, start with a low intensity and adjust as needed.
Position the light box to evenly distribute the LED lights around your product, eliminating any shadows or dark spots.
-
Adjust the Camera Settings:
Use a tripod to stabilize your camera and reduce the chances of blurry images.
Set your camera to manual mode to control settings such as aperture, shutter speed, and ISO.
Start with a moderate aperture (e.g., f/8 to f/11) for a good depth of field, a low ISO for minimal noise, and an appropriate shutter speed to achieve the desired exposure.
-
Focus and Composition:
Use manual focus to ensure that your product is sharp and in focus. Alternatively, you can use autofocus and manually select the focus point.
Pay attention to your product's composition, framing, and alignment within the frame. Rule of thirds, leading lines, and negative space can all be used to create visually appealing images.
-
Capture the Images:
Take test shots and review them on your camera's LCD screen or a tethered computer to make any necessary adjustments to lighting and composition.
Capture images from different angles and orientations to provide variety for your product listings.
Bracket your shots if needed to ensure you have correctly exposed images.
-
Post-Processing (Optional):
While the goal is to achieve a clean and professional look in the camera, some post-processing may be necessary. This can include cropping, color correction, and minor retouching.
Use photo editing software like Adobe Photoshop or Lightroom for more advanced adjustments.
-
Save and Share:
Save your edited images in the appropriate file format (usually JPEG) and resolution for your intended use, whether for an e-commerce website, social media, or print.
Organize your product images into a structured file system for easy access and management.
Upload your stunning product photos to your online store or share them on your preferred platforms to attract potential customers.
Conclusion
Using a photo light box for product photography is a game-changer for anyone looking to capture high-quality, professional images of their products. By providing uniform lighting, reducing glare, and ensuring a consistent background, a light box simplifies the photography process and enhances the visual appeal of your product listings. Whether you're a beginner or an experienced photographer, incorporating a photo light box into your workflow can significantly elevate the quality of your product photography and help you stand out in the competitive world of e-commerce. So, invest in a quality light box, follow the steps outlined in this guide, and watch your product images shine.

No comments yet