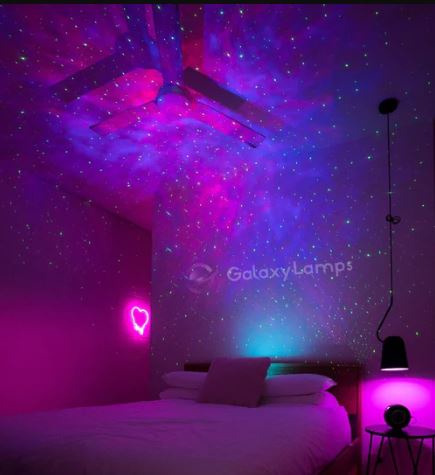
Did you know about the captivating spectacle that has fascinated humanity for centuries - the galaxy? Capturing the essence of this cosmic wonder, the Galaxy Projector 2.0, also known as the Galaxy Star Projector 2.0, brings the enchanting beauty of the universe right into your living space. Setting up and using this celestial marvel is akin to embarking on a mesmerizing interstellar journey within the comfort of your home. Let's understand the steps to set up this enchanting device and explore how to make the most out of its features, ensuring that the galaxy becomes a part of your daily life.
Step 1: Unboxing and Assembly
- Carefully unbox your Galaxy Projector 2.0, ensuring all components are present.
- Assemble the projector according to the provided instructions, securing it on a stable surface.
Step 2: Powering On and Connectivity
- Plug the projector into a power source using the provided adapter.
- Turn on the device and familiarize yourself with the control panel or remote, allowing you to adjust settings comfortably.
Step 3: Selecting Your Galaxy Experience
- Choose from a variety of projection modes, including mesmerizing nebulae, realistic stars, or a combination of both.
- Utilize color options to tailor the ambiance to your mood, whether it's calming blues or vibrant purples, the galaxy projector 2.0 offers a spectrum of choices.
Step 4: Adjusting Brightness and Rotation
- Control the brightness levels to create the perfect ambiance, whether it's a subtle background glow or a luminous cosmic display.
- Opt for rotation functionality, enabling the galaxy to dance across your walls and ceiling, adding depth and dimension to the experience.
Step 5: Customization and Timer Settings
- Personalize your galaxy projection by adjusting the focus and intensity of the stars and nebulae.
- Set timers for automatic shutdown, allowing you to enjoy the celestial display before peacefully drifting off to sleep.
Tips for Optimizing Projection Quality:
- Positioning Matters: Experiment with the projector's placement to achieve the desired coverage and clarity.
- Clean Surfaces: Ensure that the walls or ceiling where the projections appear are clean and free from obstructions for a clear display.
- Ideal Distance: Maintain an optimal distance between the projector and the projection surface for sharp and vivid visuals.
- Regular Maintenance: Periodically clean the projector's lenses to prevent dust particles from affecting the image quality.
Conclusion:
Incorporating the Galaxy Projector 2.0 into your living space transforms ordinary moments into celestial adventures. Its ability to recreate the awe-inspiring beauty of the galaxy elevates ambiance, relaxation, and creativity. By following the steps for setup and utilizing the customization options effectively, you not only bring the universe closer but also create an environment that resonates with the captivating essence of the cosmos. Let the Galaxy Projector illuminate your space, turning every moment into a celestial spectacle, and reminding you that the wonders of the galaxy are never out of reach.

No comments yet