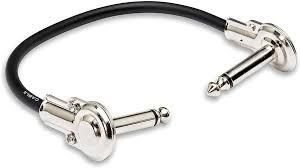
Patch cables are the often-underestimated workhorses of any guitarist's rig, facilitating the seamless transmission of audio signals between various components such as pedals, amplifiers, and other gear. Available in different lengths, materials, and configurations, these small cables play a critical role in maintaining signal integrity and minimizing interference within the setup.
The Impact of Cable Quality on Tone
The quality of patch cables can significantly influence the overall tone of your guitar rig, yet this aspect is frequently overlooked. Inferior cables may introduce signal loss, degradation, and unwanted noise, resulting in a lackluster and muddied sound. Conversely, high-quality patch cables preserve the clarity, dynamics, and nuances of your tone, ensuring a pristine signal from your instrument to your amplifier.
Understanding Cable Types
When selecting patch cables for your guitar rig, it's essential to understand the different cable types available and how they can affect your tone and performance.
Coaxial Cables
Coaxial patch cables consist of a center conductor surrounded by insulation and a shield. They offer good shielding against interference but can be less flexible compared to other cable types. Twisted pair patch cables feature two insulated conductors twisted together. They are more flexible and less prone to interference, making them an excellent choice for pedalboard setups.
Flat Cables
Flat patch cables are designed to save space on pedalboards and are often more flexible than traditional round cables. However, they may have slightly higher capacitance.
Understanding these cable types allows you to choose the one that best suits your needs based on factors like flexibility, space requirements, and interference resistance.
DIY Patch Cable Solutions
For those looking to customize their pedalboard setup or save costs, DIY patch cables can be a viable option. Here's how you can create your own patch cables:
Gather Materials
Purchase high-quality cable and connectors from reputable suppliers. Ensure the cable diameter and connector size are compatible with your pedals. Measure and cut the cable to your desired length. Use a cable stripper to remove the outer jacket and insulation from both ends of the cable.
Soldering
Tin the exposed conductor ends and solder them to the connectors. Be mindful of proper polarity (tip/sleeve) for each pedal connection. Once assembled, test each DIY patch cable with your pedals to ensure there are no connectivity issues or signal loss.
DIY Patch Cables Guitar can be a cost-effective and rewarding way to customize your pedalboard setup while ensuring high-quality connections.
Troubleshooting Patch Cable Issues
Even with quality patch cables, occasional issues may arise in your guitar rig. Here's how to troubleshoot common patch cable problems: Inspect each patch cable connection to ensure they are securely plugged into the pedals and pedalboard. If you notice intermittent connectivity or signal dropouts, swap out suspect patch cables one at a time to identify the faulty one.
Isolating Noises
Use a process of elimination by removing pedals one at a time from your chain to identify which one is causing unwanted noise.
Signal Loss and Degradation
Longer or poorly shielded patch cables can lead to signal loss and degradation over distances, affecting the fidelity and richness of your tone. High-quality cables with low capacitance and premium connectors mitigate these issues, preserving the full spectrum of your guitar's tone and sustaining its inherent qualities without compromise.
Noise and Interference
Patch cables are susceptible to electromagnetic and radio-frequency interference, which can disrupt the signal path and introduce unwanted noise into your sound. Cheap cables lacking proper shielding exacerbate these issues, whereas premium cables feature robust shielding and connectors designed to minimize interference, ensuring a clean and noise-free signal transmission.
Durability and Reliability
For gigging musicians, reliability is paramount, and inferior patch cables simply won't withstand the demands of live performance. Cheap cables are prone to wear and tear, with flimsy connectors and thin cables that can fail mid-performance. In contrast, high-quality cables are built to last, boasting rugged construction and strain relief features that ensure durability and reliability even under rigorous touring conditions.
Factors to Consider When Choosing Patch Cables
Several factors should guide your selection of patch cables, including length, cable material, connectors, and flexibility. Choosing the appropriate length minimizes cable clutter and signal loss, while high-quality conductors, shielding materials, and connectors ensure optimal signal transmission, reliability, and durability. Flexibility is also crucial for easy routing within your pedalboard setup, reducing strain on connectors and minimizing signal degradation over time.
Investing in Your Tone
While it may be tempting to cut costs on patch cables, investing in high-quality cables is an investment in your tone. A modest investment in premium patch cables can yield significant improvements in sound quality, clarity, and reliability, enhancing your overall playing experience and ensuring that your guitar rig performs at its best, both in the studio and on stage.
Conclusion
Patch cables may seem like minor components within your guitar rig, but their impact on tone and performance should not be underestimated. Choosing high-quality cables is essential for minimizing signal loss, noise, and interference while maximizing clarity, reliability, and durability. By investing in premium patch cables, you're investing in the quality and integrity of your sound, allowing your tone to shine through with every note you play.


No comments yet