It's simple to use the Wavlink AC1200 WiFi Extender Setup providing the thrilling benefits of greater speed and enhanced connectivity. Due to its intuitive design, installation is a very simple operation. Just connect the extender in, create a network unity, and use a web browser to navigate to the user-friendly setup page. With the help of easy-to-follow on-screen orders, you will quickly set up the extender to boost the WiFi network's range and speed. Using the AC1200's stunning performance, one can say good to dead zones and enjoy uninterrupted connectivity across your space. With the Wavlink AC1200 WiFi Extender, enjoy the joy of a faster reliable internet connection.
Wavlink AC1200 setup instruction guide.
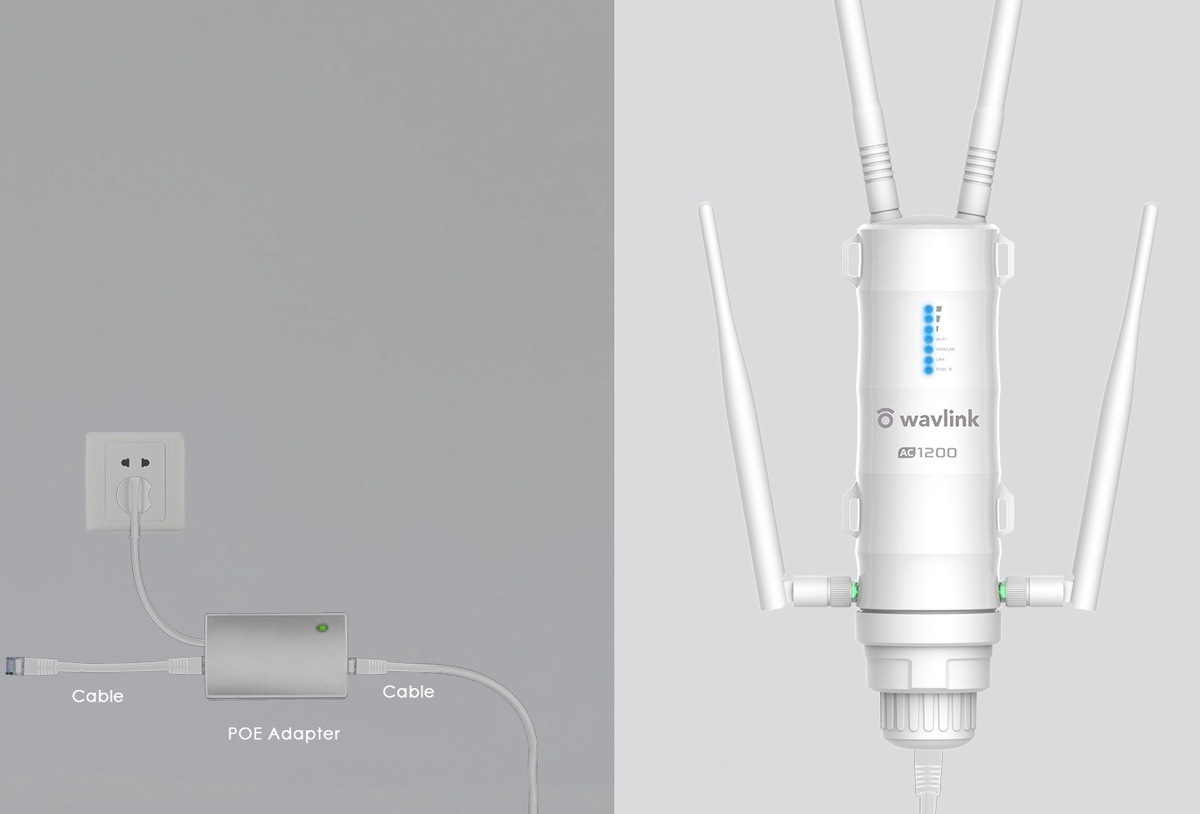
- For a strong connection, install the Wavlink AC1200 close to the present WiFi network and plug it into a power outlet.
- Go to a list of accessible WiFi networks on your smartphone or PC.
- Create a link to the Wavlink network (frequently referred to as "Wavlink_Extender").
- Open a web browser and enter the extender's default IP address—usually 192.168.0.1—in the address package.
- To select to create a link to your current WiFi network, follow the on-screen steps. When prompted, enter the WiFi password.
- Choose a name and password for the network extender that the AC1200 has set up.
- Your devices will connect to this network so as to have greater reach.
- Allow for the extender to reboot following changing the setup page.
Useful feature of wavlink AC1200 setup
- An extender with the AC1200 designation typically supports.
- both the 2.4 GHz and 5 GHz frequency bands.
- Better performance and decreased interference are made possible by this, especially in densely populated wireless regions.
- Support for speeds of data transfer as high as 1200Mbps is stated by AC1200,
- enabling a fast and reliable connection for high-bandwidth.
- activities such online gaming and streaming.
- The AC1200 is one of many Wavlink devices which frequently.
- offer a WPS (Wi-Fi Protected Setup) feature or a one-key setup.
- They might be LED indicators on the extender that can help
- you find the most suitable spot for placing it.
- You may utilise some Wavlink extenders as a traditional access point since they offer AP mode
Common issue for wavlink ac1200 wifi extender setup
- Make sure the extender has been turned on and plugged in securely
- For a strong signal, place the extender fairly close to the router.
- To reset the extender if you're experiencing issues.
- attempt to hold up the reset button for ten seconds until releasing go.
- Joining the extended network with your device (the SSID typically ends as "_EXT").
- Observe the LED signs to see if the extender has been connected to the router.
- Consider changing the extender by following the setup process if issues continue.
Wavlink AC1200 WiFi Extender via manually method
- Once the Wavlink AC1200's power LED improves, plug it into a power outlet.
- visit your device's WiFi settings and choose the "Wavlink_Extender.
- Launch Web Browser: Launch a web browser and enter the default IP address, such as 192.168.0.1 in the address box.
- To log in to Extender, use the standard login information (see the handbook for specifics).
- Usually, this will be something like "admin" for both the password and username.
- Select your present WiFi network and connect to it through the instructions displayed on the screen.
- Then, create a new extended network name and password and save your modifications. Once you've saved, wait for the add-on.
NOTE :Call an expert or go to the official website if you need help with your Wavelink wifi range extender. wavlink ac1200 extender setup.
Guides for installing the Wavlink AC1200 via WPS method
- Set up your Wavlink Outdoor Extender right now.
- Confirm that it is in close contact to the home router.
- Please push the booster's WPS button.
- On your home router, press the same WPS button now.
- It indicates that your repeater has been set correctly when it exhibits three constant green lights.
- Because the repeater is detachable, you are able to put it where you wish.
- The Wavlink AC1200's WPS configuration has grown complete.
How do i login Wavlink AC1200 extender
- Check that the device has access to the WiFi network of the Wavlink AC1200 extender.
- Look for a network using the suffix "Wavlink_Extender" and create an association using it.
- Start a web browser on the device you have related to, such as Firefox, or Google Chrome.
- Put the Wave Link extender's default IP address in the browser's address bar. Common URLs.
- Type the Wave Link extender's default password
- This is generally "admin" as both the password and the username.
- Read the user manual for any changes.
- You can change and manage an array of alternatives via this place, such as WiFi settings and security.
Wavlink AC1200 Troubleshooting Tips.
- Pull the router's power cable.
- Hang on for 10 to 15 seconds.
- Plug the power cable, and then let the router restart.
- Confirm that an accurate link is being provided by your internet service provider (ISP).
- To figure out if the issue is with the router or the internet service
- you can perform an end-to-end test of the internet connection by connecting a device directly to the modem.
- Test that each cable—power, Ethernet, etc.—is securely fastened to the modem and router.
- To find out if your router model had any firmware updates available check the Wavlink website.
- To change the router's firmware, if any is available do what's suggested by the company that makes it.
- For about ten seconds, use a small, pointed tool to press and hold the router's reset button.
- The router will be restored to its default factory settings as an outcome.
- Keep in mind that after resetting the router, you need to reconfigure it.
Wavlink AC1200 Wifi extender setup using Router
- To figure out if the issue is with the router or the internet service,
- You can perform an end-to-end test of the internet connection by connecting a device directly to the modem
- .A power outlet near your router is where you ought to stick the Wavlink AC1200 WiFi extender in.
- Turn on the extender's power.
- Use a device (a laptop, tablet, or phone) to get to the Wi-Fi settings.
- Searching for the extender's default network name (SSID), and it's often "Wavlink_EXT".
- On the connected device, open a web browser.
- In your address bar, enter the extender's default IP address, most often 192.168.10.1.
- Enter the default login details (the default password and username may be found in the user manuals).
- Search for the option to find Wi-Fi networks that are available.
- Select the main router's network from the menu that appears.
- When requested, enter the network password for your main router.
- After confirming any changes, save the settings.
- Link your devices to the new network while the extender
Update Guide for Wavlink AC1200 Extender Firmware
- Check that the device is connected to the WiFi network of the Wavlink AC1200 growth.
- Create an association using the network referred to as "Wavlink_Extender."
- Start a web browser on the device you have related to, such as Safari, Mozilla Firefox, or Google Chrome.
- Put the Wave Link extender's default IP address in the browser's address bar. Example Addresses include.
- On the extender's settings page, look for a section on firmware or software updates.
- The instructions for beginning the update process that appears on the screen.
How to reset wavlink AC1200 wifi extender?
- On the WiFi extender, find the reset button. Usually, it's small.
- recessed button that has to be pushed with a paperclip or other like device.
- Check that the WiFi extender has a power provider linked to it and it's turned on.
- Hold down the reset button via a paperclip or other similar implement
- Pushing up the reset button using a paperclip or comparable method
- Press the reset button after the allotted amount of time is up.
- Let the WiFi extender some time to recover and go back to its normal factory settings.

No comments yet