With ease, expand your network to the great outdoors! With these few steps, setting up the Wavlink Aerial HD4 Outdoor extender is a breeze.
Our home or business WiFi network can be extended to areas with little to no service with the Wavlink Aerial HD4 Outdoor Extender Setup . Aerial HD4 is an outdoor wireless range extender created to increase the signal strength and range of your WiFi network. The device supports speeds of up to 1200Mbps and works in the 2.4GHz and 5GHz frequency bands.The Wavlink Aerial HD4 Outdoor Extender Setup is simple to set up and works with the majority of WiFi routers.
Based on your usage and demands, we'll go through three different installation techniques for the Wavlink Aerial HD4 outside extender setup.
- Lan Bridge
- Router
- Repeater
Configure Wavlink Outdoor extender using LAN Bridge
- Switch on the Wavlink AC1200 by plugging it into an electrical outlet.
- Attach the Wavlink AC1200 to your router using an Ethernet cable.
- Join your device's Wavlink Aerial HD4 outdoor extender Setup to another Ethernet port on a PC or TV.
- Check your device's network settings to make sure it is connected to the Wavlink AC1200 network.
- Enter the Wavlink aerial HD4's IP address into the address bar of the web browser on your device (the default IP is usually 192.168.0.1).
- Type the default login credentials for the Wavlink AC1200.
- Go to the "LAN" or "Network" settings in the Wavlink AC1200 web interface.
- Under the "LAN Bridge" or "Bridge Mode" section, choose the option to enable LAN bridge.
- Save your changes and restart the Wavlink Aerial HD4 for them to take effect.
Your device should now be connected to the internet through your router and the Wavlink AC1200. You have now successfully installed your Wavlink Aerial HD4 outside extender.
Wavlink AC1200 extender setup in Router mode
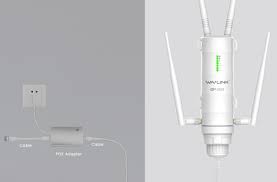
The Wavlink AC1200 connection (POE) box should be connected first.
- The Ethernet connection from the POE box needs to be connected to the Aerial HD4 outside extender.
- Connect the second Ethernet wire to your main router or modem using the same connection box.
- Any wirelessly capable device can now be connected to the WAVLINK-N network.
- Go to wifi.wavlink.com in your browser once you've established a connection.
- You've reached the setup page for the Wavlink Aerial HD4 outside extender.
- To log in, enter the "admin" default password.
- Make "Router" your choice, then give your booster a catchy name.
- WPA2-PSK as the security setting ( recommended ). After that, enter the password for your extender and select "Next."
Now that the Wavlink AC1200 extender has been successfully set up in router mode, use it.
Wavlink Aerial HD4 Outdoor Extender Setup in Repeater Mode
Configuring your extender in repeater mode is one of the easiest methods. To set up the Wavlink Aerial HD4 outdoor Extender setup in repeater mode, follow these steps:
- The Aerial HD4 POE connection must first be wired with a power source.
- Connect the POE's ethernet connection to the Wavlink Aerial HD4 extender once it receives a solid green signal.
- Remove any mobile phones or computers with wireless capabilities from the area.
- Under the wireless settings menu, look for the WAVLINK-N network.
- Open a compatible web browser after logging in to the default network
- Type ap.setup or 192.168.10.1 now.
- You have reached the Wavlink Aerial HD4 extender's settings page.
- You should type in the standard username and password.
On your current WiFi network, the Extender is now Setup to act as a repeater.
Wavlink AC1200 Firmware Update
Updates to the Wavlink AC1200 firmware are required for a Wavlink AC1200 extender to function properly since the new firmware enhances feature functioning and device security. You must update the firmware on your Wavlink AC1200 if there are any problems. It offers improved security along with additional features that will help you resolve your problems.
Here are the steps for updating the Wavlink AC1200 extender firmware.
- Your Wavlink Aerial HD4 is powered on.
- Locate Ap.setup.
- Then, choose firmware upgrade under settings.
- To finish the firmware upgrade procedure, follow the steps.
- Avoid interfering with the extender upgrade process or turning it off.
- The extender reboots itself automatically after the update is finished.
This is how the Wavlink AC1200's firmware gets updated.
How to reset my Wavlink Aerial AC1200 wifi extender?
If you need to reset your AC1200 extender but you've forgotten your admin login or password, you must first do a factory reset. When you reset the Wavlink AC1200, all of your personal data—including passwords, usernames, and SSIDs—is erased, readying your extender for a fresh setup process. To finish the factory reset process, use a paper clip or a needle.
Follow the instructions below to reset the Wavlink Aerial HD4:
- On the device's rear portion, there is a reset button.
- Use a paperclip or other tiny object to firmly press and hold the reset button for approximately 10 seconds.
- Let the computer reboot.
- After resetting the device, open your web browser and type in the Wavlink default IP address (192.168.0.1) to access the setup page.
- To set up the device according to your preferences, follow the directions on the setup page.
- The device will be reset and ready to use once configuration is complete.
Please do not hesitate to contact our technical specialists for free support via our toll-free helpline or live chat if you run into any problems setting up your Wavlink wifi extender.
No comments yet