If you have a Canon camera and a Mac computer, you can transfer your photos using wifi. This can be done by connecting your camera to your computer using an Ethernet cable. Once the connection is made, you will need to open the Canon software on your computer. Once the software is open, you will be able to select the photos you want to transfer. After you have selected the photos, you will need to click on the “transfer” button. The transfer process may take a few minutes, depending on the number of photos you are transferring.
Read More: how to connect canon camera to mac
In recent years, Canon has made it easier than ever to transfer photos from your camera to your Mac—and they’ve done it all wirelessly. With the release of their latest line of cameras, the process has gotten even simpler. Here’s a quick step-by-step guide on how to get your photos from your Canon camera to your Mac using wifi.
Assuming you’ve already set up your Canon camera for wifi transfer and have installed the necessary software on your Mac, the first thing you need to do is open up the Canon Camera Connect app on your computer. Once the app is open, select ‘Wireless Connection’ from the main menu.
Next, select your camera from the list of available devices and enter in the password (if prompted).
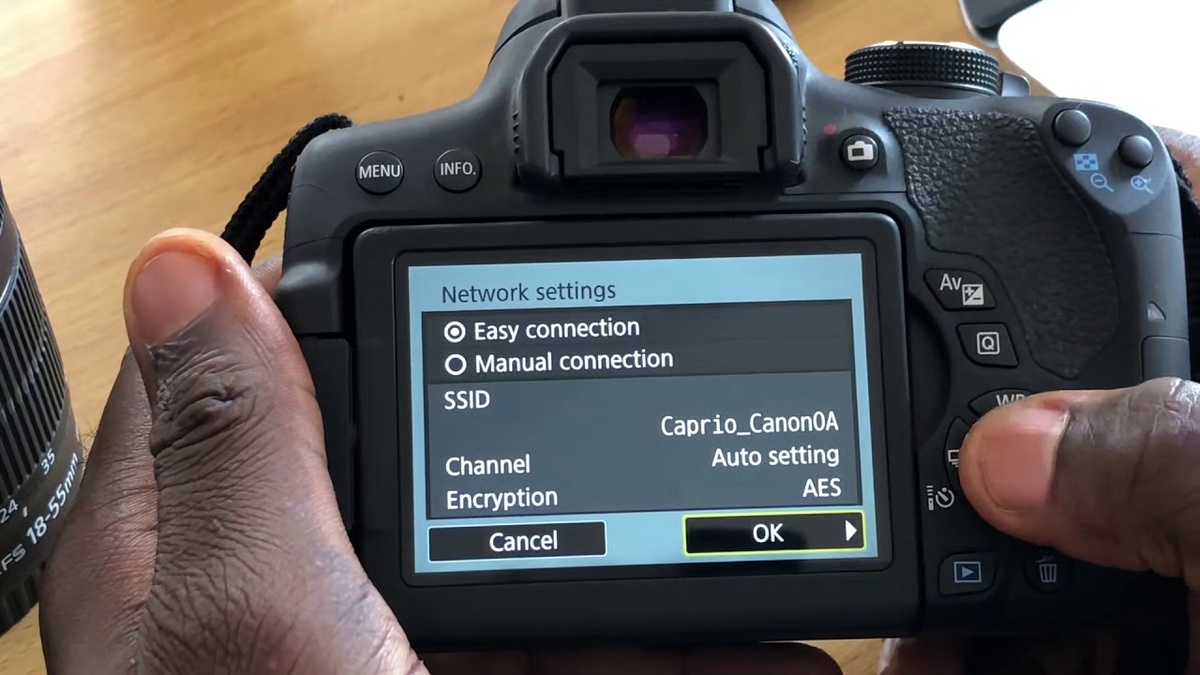
How to enable wifi on Canon camera
If you have a Canon camera with built-in WiFi, you can connect it to your Mac using the Camera Connect app. This will allow you to transfer photos and videos from your camera to your Mac wirelessly.
To enable WiFi on your Canon camera, first make sure that the camera is turned on. Then press the Menu button and navigate to the WiFi settings. Select the Enable option and then choose the SSID of your wireless network. Enter the password for your network when prompted. Once connected, you can launch the Camera Connect app on your Mac and follow the prompts to transfer photos and videos.
How to connect Canon camera to Mac using wifi
If you have a newer Canon camera, you may be able to transfer your photos to your Mac using wifi. Here’s how:
1. Enable wifi on your Canon camera. Consult your camera’s manual for instructions on how to do this.
2. Once wifi is enabled, open the “Menu” on your camera and navigate to the “Wireless Communications” settings.
3. Select “PC connection method” and then choose “Wireless LAN setting.”
4. Choose “New Connection…” and then select your computer from the list of devices that appears.
5. Enter the password for your computer’s wireless network and click “OK.”
6. Import photos from camera to computer on your camera. 7. Select an image and then press the MENU button.
8. Select Transfer to PC or smartphone > Wi-Fi transfer > Canon Camera Connect app.
How to transfer photos from Canon camera to Mac
Canon cameras have built-in WiFi capabilities that make it easy to transfer photos to your Mac computer. Here's how to do it:
1. First, make sure your camera is connected to the same WiFi network as your Mac.
2. Next, open the Canon Camera Connect app on your Mac.
3. Once the app is open, go to the "Camera Settings" tab and select "Wireless LAN."
4. Then, select "Device List" and choose your camera from the list of available devices.
5. Finally, click on the "Get Images" button and all of the photos on your camera will be transferred to your Mac!

No comments yet