A Wi-Fi range extender called the Netgear EX6110 is made to improve wireless coverage in your house or place of business. It aids in extending the range of your current Wi-Fi network, enhancing connectivity in locations with a marginal or missing signal. Plugging it in and configuring through a web interface usually suffice for setup. The Netgear EX6110 Setup may improve your Wi-Fi signal, which makes it a practical alternative for expanding Wi-Fi coverage in remote areas.
Netgear Ex6110 Extender Setup Manually
To Netgear EX6110 Wi-Fi extender setup via manual in very brief steps:
- Plug In: Plug the EX6110 into a power outlet and wait for the power LED to turn solid.
- Connect to Extender: On a device (phone, laptop), connect to the "NETGEAR_EXT" Wi-Fi network.
- Open Browser: Launch a web browser and enter "mywifiext.net setup" in the address bar.
- Login: Follow on-screen instructions to log in (use default username and password if unchanged).
- Select Network: Choose your existing Wi-Fi network and enter its password.
- Complete Setup: Follow prompts to complete the setup. The extender will reboot and connect to your Wi-Fi network.
Your Netgear EX6110 extender should now be set up and extending your Wi-Fi coverage manually.
Note: If you need any help regarding your Netgear EX6110 wifi extender so contact our technician or visit the official website that is mywifiext.net setup.
How to setup Netgear EX6110 WPS?
To set up the Netgear EX6110 using WPS (Wi-Fi Protected Setup) in very brief steps:
- Plug In: Plug the EX6110 into an electrical outlet within range of your Wi-Fi router.
- Press WPS Button: Press the WPS button on the EX6110. The WPS LED on the extender should blink.
- Press WPS on Router: Within 2 minutes, press the WPS button on your Wi-Fi router.
- Wait for Connection: Wait for the WPS LED on the extender to turn solid, indicating a successful WPS connection.
- Relocate If Needed: If necessary, relocate the extender to an optimal location for improved Wi-Fi coverage.
Your Netgear EX6110 should now be extended and enhance your Wi-Fi network using WPS.
Netgear ex6110 wifi range extender firmware update
- Make that the Wi-Fi network of the Netgear EX6110 extender is connected to your computer or mobile device.
- Open a browser and type the IP address of the extender into the address bar. Typically, the IP address is "192.168.1.250". Enter the key.
- To sign in, enter your username and password. Use the default credentials if you haven't altered them.
- In the extender's settings, look for a "Firmware Update" or comparable option. In the "Settings" or "Advanced" section, normally.
- To check for updates online, select the relevant option. The extender will establish a connection with Netgear's servers and see if a new firmware update is accessible.
- Follow the on-screen instructions to download and install the update if a new firmware version is found.
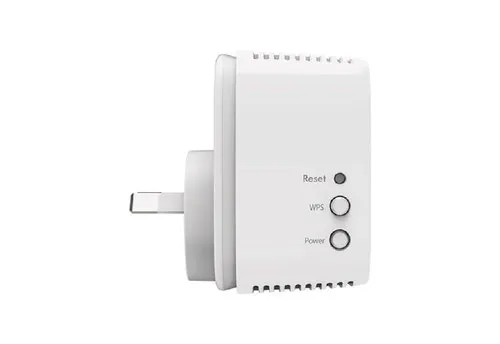
How can a Netgear AC1200 EX6110 reset?
Follow these instructions to reset a Netgear AC1200 EX6110 Wi-Fi extender:
- On the extender, locate the reset button. The "Reset" label is typically located in a tiny hole.
- Press and hold the reset button for 10 to 15 seconds using a paperclip or a similar instrument.
- Release the reset button after holding it for the allotted amount of time.
- It will reboot and reset the extender. Hold off till the procedure is over.
Default factory settings have been restored on the Netgear AC1200 EX6110 extender. You may set up the device just like you would a new one.

No comments yet