As roads become busier and traffic conditions more unpredictable, the need for enhanced safety measures has never been more critical. Dash cameras, or dash cams, have emerged as valuable tools for both individual drivers and fleet operators. These compact devices record real-time footage, providing an unbiased account of events on the road. Installing a dash cam is a proactive step towards improving road safety and protecting yourself in the event of an accident or dispute. Check out: Dashcam installation
In this guide, we will walk you through the process of dash cam installation, ensuring that you harness the full potential of this modern driving accessory.
Choosing the Right Dash Cam:
Before diving into the installation process, it’s essential to choose a dash cam that suits your needs. Consider factors such as video resolution, field of view, storage capacity, and additional features like GPS tracking and parking mode. Once you’ve selected the ideal dash cam, it’s time to embark on the installation journey.
Installation Steps:
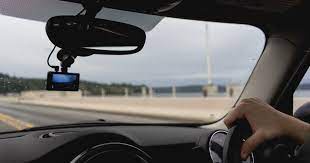
1. Identify a Suitable Mounting Location: Choose a strategic location on your windshield that provides an unobstructed view of the road ahead. Most dash cams come with suction cup mounts or adhesive mounts for easy attachment to the windshield. Ensure that the chosen spot does not obstruct your view and complies with local laws.
2. Prepare the Windshield Surface: Clean the selected area thoroughly to ensure proper adhesion. Use a glass cleaner and a lint-free cloth to remove any dirt, dust, or residue that may affect the mounting process.
3. Mount the Dash Cam: Attach the dash cam to the windshield mount according to the manufacturer’s instructions. Make sure the device is securely fastened and aligned for optimal recording. Some dash cams come with adjustable mounts to accommodate various windshield angles.
4. Connect the Power Source: Dash cams typically use the vehicle’s power supply through the cigarette lighter socket. Connect the power cable to the dash cam and route it along the windshield’s edge and down the vehicle’s interior, tucking the cable out of sight for a clean and organized look.
5. Hide the Wiring: Conceal the power cable along the vehicle’s interior, following the natural contours and hiding it from view. Many dash cams include cable clips or adhesive clips to secure the wiring neatly along the edges of the windshield and dashboard: Toronto dash cam
6. Connect to Power and Test: Insert the power plug into the cigarette lighter socket, ensuring a secure connection. Power on the dash cam and verify that it starts recording. Adjust settings as needed, such as video resolution, date and time, and any additional features.
7. Install a Memory Card: Most dash cams record footage onto a removable microSD card. Install a suitable memory card according to the manufacturer’s recommendations. Ensure that the card has sufficient storage capacity for your recording needs.
8. Fine-Tune Settings: Explore the dash cam’s settings menu to customize options such as loop recording, motion detection, and emergency event locking. Adjust these settings to suit your preferences and maximize the effectiveness of your dash cam.
Conclusion:
Dash cam installation is a straightforward process that empowers drivers with an extra layer of safety and security on the road. By choosing the right dash cam and following these installation steps, you’ll be equipped with a reliable witness to capture your journeys, enhance road safety, and provide valuable evidence in the event of unforeseen incidents. Install with confidence, drive with peace of mind, and embark on your journeys with the assurance that your dash cam is there to safeguard your driving experience.
For more information regarding Vancouver dash cam visit our website: https://safedrivesolutions.com/

No comments yet