In the fast-paced digital world, our reliance on email communication is ever-growing. Microsoft Outlook, one of the most widely used email clients, is a powerful tool for managing emails, contacts, calendars, and tasks. However, the importance of safeguarding your data cannot be overstated. Regularly backing up your Outlook emails is a crucial step in ensuring that your valuable information is protected from unexpected events like computer crashes, accidental deletions, or system failures.
Why Backing Up is Essential
Imagine the scenario: years' worth of important emails, business contacts, and vital information suddenly disappear due to a technical glitch or hardware failure. This nightmare can be avoided by implementing a robust backup strategy. Creating backups not only safeguards against data loss but also provides a contingency plan for migrating to a new system or recovering from a cyberattack.
Step 1: Launch Microsoft Outlook
The first step in backing up your Outlook emails is to open the application. Ensure that your Outlook is updated to the latest version to take advantage of any security and performance improvements.
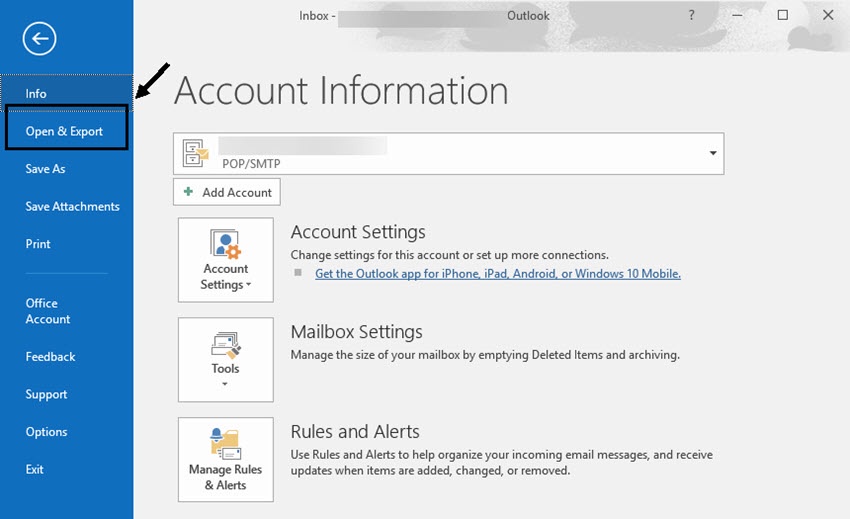
Step 2: Access the Import and Export Wizard
- Navigate to the "File" tab in the top-left corner of the Outlook window.
- Select "Open & Export" from the menu on the left.
- Choose "Import/Export" to open the Import and Export Wizard.
Step 3: Select "Export to a File"
- In the Import and Export Wizard, choose "Export to a file" and click "Next."
- Select "Outlook Data File (.pst)" as the file type and click "Next."
Step 4: Choose the Data to Export
- Highlight the email account you want to back up. Ensure that "Include subfolders" is checked to include all folders within the selected email account.
- Click "Next."
Step 5: Specify the Destination
- Choose a location on your computer or an external storage device to save the backup file. You can also set a password for added security if needed.
- Click "Next."
Step 6: Complete the Process
- Click "Finish" to start the backup process. Outlook will prompt you for a password if you chose to set one.
- Depending on the size of your mailbox, the export process may take some time.
Step 7: Verify the Backup
Once the export is complete, it's wise to verify that the backup file (.pst) has been created successfully. You can do this by checking the specified location for the backup file.
Conclusion
Backing up your Microsoft Outlook emails is a proactive measure that can save you from potential data disasters. By following this step-by-step guide, you can ensure that your valuable emails, contacts, and other important information are securely stored and readily available whenever you need them. Regularly scheduled backups will provide you with peace of mind, knowing that your digital communication history is safe and accessible, even in the face of unexpected challenges. Don't wait until it's too late – start backing up your Outlook emails today!

No comments yet