
Customers who are browsing on Shopify stores usually enjoy seeing a specific product's page after clicking on a product image on the collection page. In fact, by inserting links to the collections in a menu in your store's navigation, this action can really help customers find and see many categories. At the same time, you can view, create, and edit collections or categories from your Shopify admin's collections page.
As a result, in this article, I will provide you with step-by-step instructions for adding a category to your Shopify store.
What is a category?
One of the highest classes for most objects to be grouped based on similarity or defined criteria is known as a category.
A category is also known as a collection on Shopify. More specifically, products are frequently grouped into collections in order to make it easier for customers to identify their products. Category is the name of that group collection. For example, a category could be clothing collections for men, women, or children. It can be items of a specific type, such as cosmetics or housing, or it can be items on sale or seasonal products.
How to add category in Shopify
In this section, I will show you step-by-step instructions on how to add a new category to your Shopify store.
Adding a new category
Step 1. Log in Shopify account
Of course, first of all, you need to log into your Shopify account to start getting all your work done.
Step 2. Open Collections section
After that, direct yourself to the Collections section, and then opt for the Add a Collection option
Step 3. Fill in Collection details
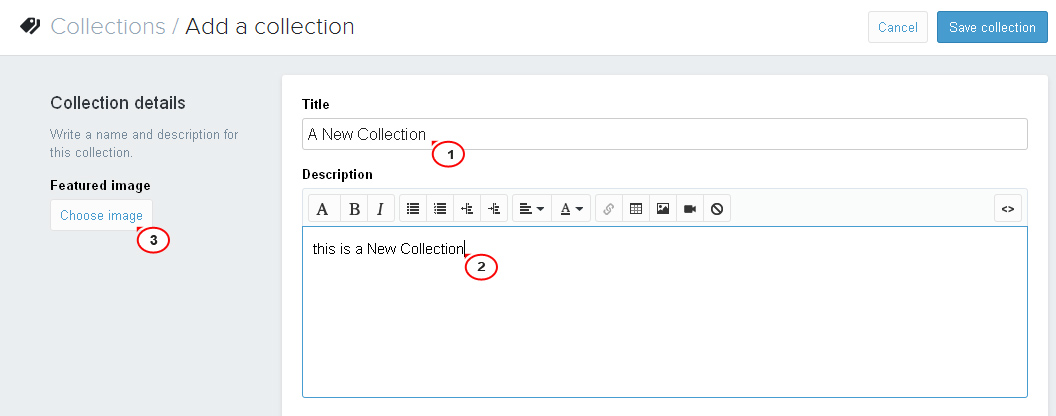
From here, just fill in the Collection details that you want your collection to have. Here are several things that you need to know while filling:
- Define the
Titlefor your new collection. - Enter its
Description. - If you want to add an image to the collection, just click on the
Choose Imagebutton, which locates under theFeatured Imagefield. You will see it on the left side of the screen and then just select the image from your computer.
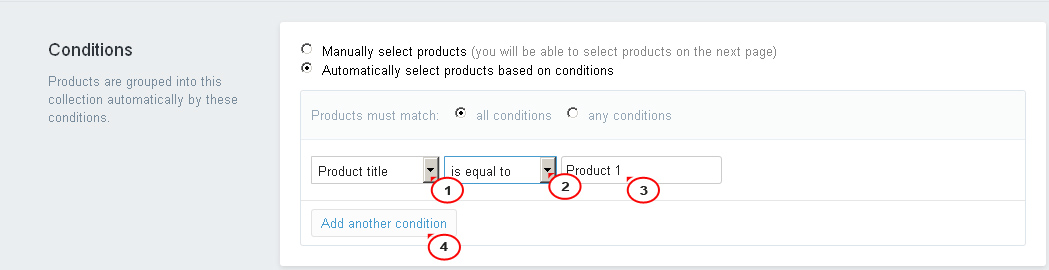
Step 4. Fill in Conditions section
Next, scroll down to the Conditions section of your new collection to continue the procedure. From here, you are able to opt for either Manually select products or Automatically select products based on conditions option.
- If you choose to add products to collection manually, follow the tutorials below:
-
Click the
Manually select productsoption. -
Now, you need to proceed to fill all your blank sections of your new collection, which can be
Search Engines,Visibilitysections and many more.
-
When you are done with filling, just click on the
Save Collectionbutton. -
There will be the
Productssection provided on the left, so find theAdd Productssection and then choose the products that you would like your New Collection to have.
- Finally, just simply click
Saveat the bottom right of the screen.
- If you choose to add products to collection automatically, follow the tutorials below:
-
To begin, select 'Automatically select products based on conditions.'
-
Then, select a condition from the list, such as Product Title, Product Type, Product Vendor, and so on. Following that, you must fill in the blank field of each corresponding section of each product that you want to include in your new collection.
-
If you would like to add more than one product to your collection, just click on the
Add another Conditionbutton.
-
Next, you need to proceed to fill all your blank sections of your new collection, which can be
Search Engines,Visibilitysections and many more. -
After when all things are done, click
Save Collection.
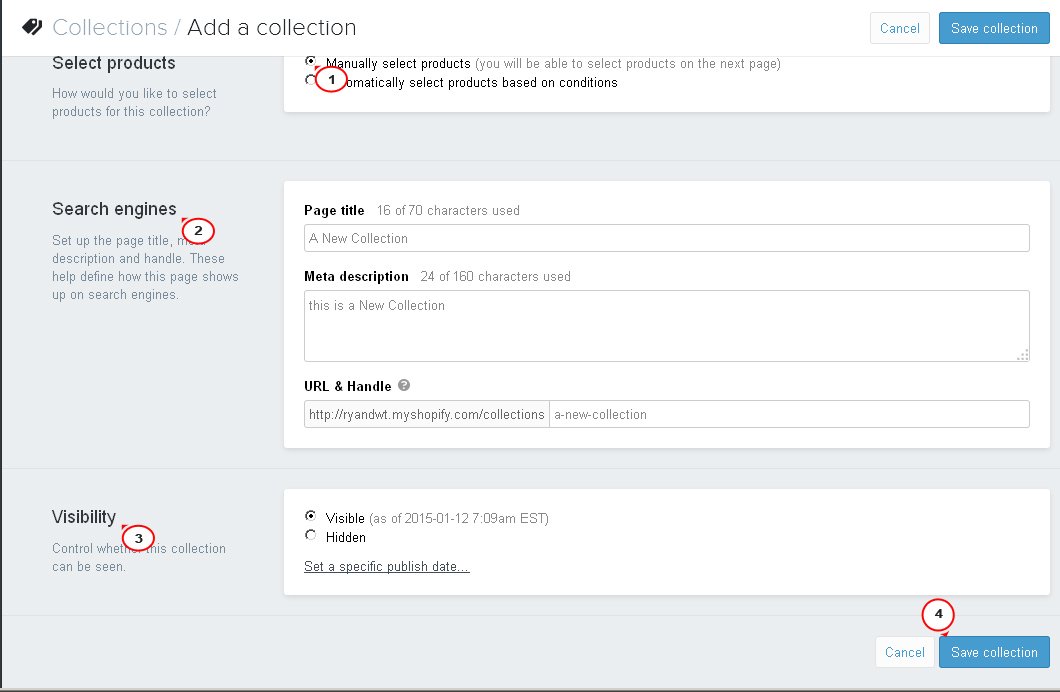
Step 5. Fill in Search Engines fields
From the Page title, Meta description and URL and Handle boxes, you will see that they have already contained some information. These have been automatically generated based on the entries that you created in the Collection details section earlier. From here, you can change the Page title and Meta description details. However, remember not to make any changes to the URL and handle field.
Step 6. Choose options in Visibility section
Now, you are capable of setting the new collection to Visible or Hidden on your store. Also, you can even set a specific to publish date for your online collections in case you want your collection to be displayed on your website some days in the future.
Step 7. Click Save Collection
Finally, click Save Collection
To add a new category on iPhone and Android.
Thank you for reading

No comments yet