When it comes to managing an e-commerce store on Shopify, efficiency and organization are key. Collections play a crucial role in categorizing and presenting your products to customers. Whether you're looking to migrate your store or simply streamline your collection management process, understanding how to import and export collection data is a skill that can save you time and effort. In this guide, we'll walk you through the steps to confidently import and export collection data in Shopify.
Understanding Collection Data in Shopify
Collections are a way to organize your products based on specific criteria, making it easier for customers to navigate your store. Whether it's grouping products by category, season, or any other relevant factor, collections enhance the user experience and boost sales.
Importing Collection Data: Step-by-Step
Step 1: Prepare Your Data
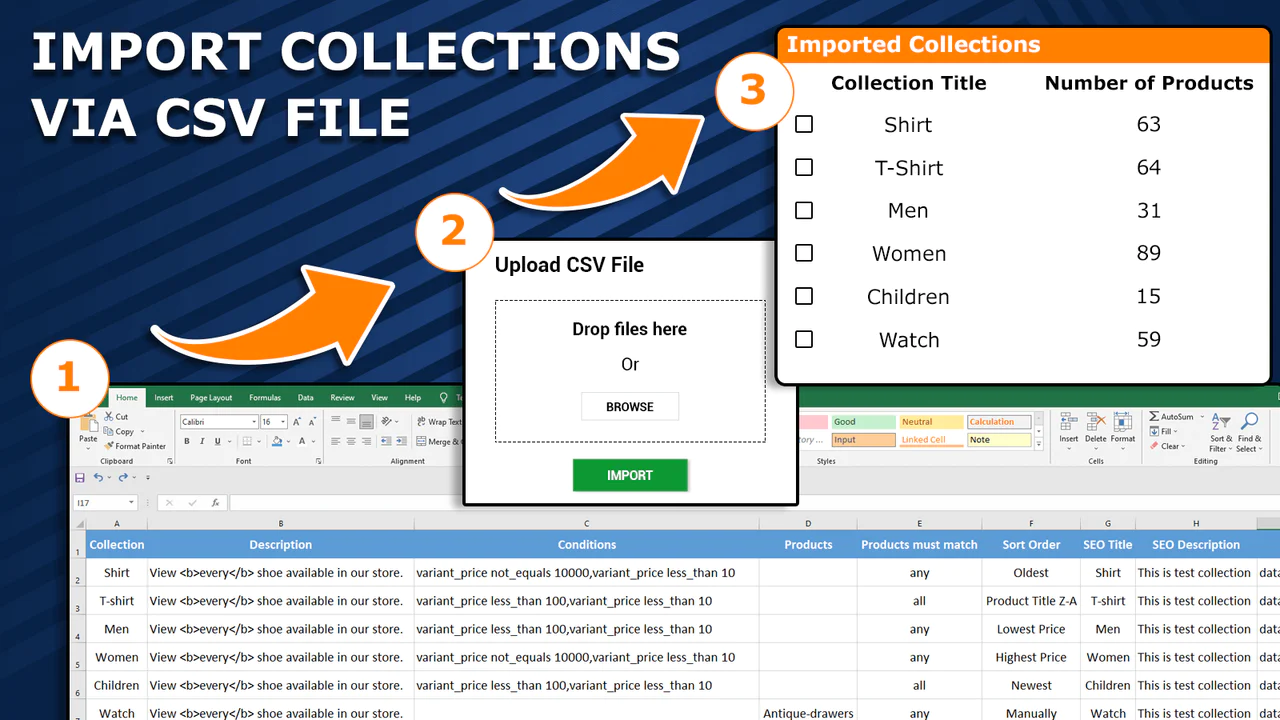
- Create a spreadsheet (CSV or Excel) with columns for collection names, handles, descriptions, and any other relevant details.
Step 2: Access Shopify Admin
- Log in to your Shopify admin panel.
Step 3: Navigate to "Products"
- From the left-hand menu, click on "Products."
Step 4: Choose "Collections"
- Click on the "Collections" tab.
Step 5: Select "Import"
- Click on the "Import" button at the top right corner.
Step 6: Upload Your File
- Click on "Choose File" and select the spreadsheet you prepared.
- Map the columns from your file to the appropriate collection fields in Shopify (e.g., Collection Title, Handle, Description).
Step 7: Review and Import
- Review the mapping to ensure accuracy.
- Click "Import" to start the process.
Exporting Collection Data: Step-by-Step
Step 1: Access Shopify Admin
- Log in to your Shopify admin panel.
Step 2: Navigate to "Products"
- From the left-hand menu, click on "Products."
Step 3: Choose "Collections"
- Click on the "Collections" tab.
Step 4: Select "Export"
- Click on the "Export" button at the top right corner.
Step 5: Choose Export Type
- Select the type of export you need: "Current page" (exports the current page of collections) or "All collections" (exports all collections).
Step 6: Customize Exported Fields
- Choose the fields you want to include in the export.
- Click "Export collections."
Best Practices and Tips
-
Consistency is Key: Maintain a consistent naming convention for your collections to avoid confusion during imports and exports.
-
Backup Your Data: Before making any significant changes, it's a good practice to backup your data to prevent data loss.
-
Use CSV Format: When exporting and importing data, CSV (Comma-Separated Values) format is recommended for compatibility and ease of use.
-
Handle with Care: Handles are unique identifiers for collections. Ensure they are unique and follow a standardized format to avoid conflicts.
-
Review and Test: Always review your imported or exported data to confirm that it's accurate. Consider performing a test import or export with a small dataset before working with larger data.
Conclusion
Efficiently managing collections is essential for delivering a seamless shopping experience to your customers. By mastering the art of importing and exporting collection data in Shopify, you'll not only save time but also ensure that your store remains organized and user-friendly. Whether you're reorganizing your store or preparing for a migration, these steps will equip you to handle collection data with confidence.

No comments yet